![paragon logo-1.png]](https://support.paragon-erp.com/hs-fs/hubfs/paragon%20logo-1.png?width=240&height=75&name=paragon%20logo-1.png)
Introduction
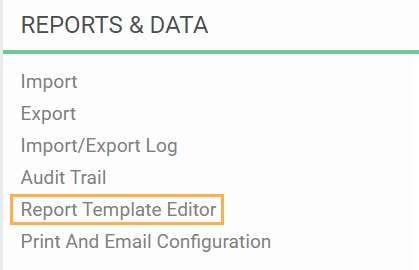
Accessing the report template editor
Under the reports & data card, you will find the report template editor option.
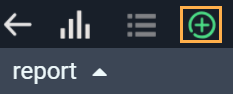
Create a new template
Click the add new button to create a new template.
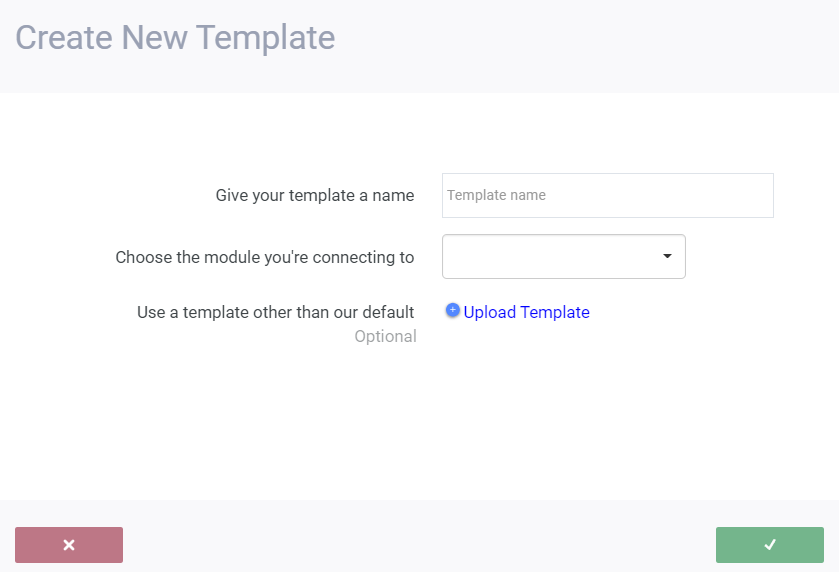
- Add a name to the template
- Select the appropriate module for the template
- If you don't want to use the default template, you can always import your own template by clicking upload template
- Click accept to create the template
Customize your PDF template
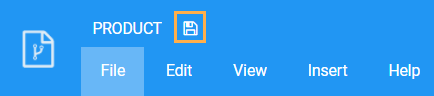
Once you accept, you can customize your PDF template however you would like.
Note that we advise that you save in between any modifications you make by clicking on the save button next to the template name.
When you first create a new template, you will get the default template to start from. There are certain details (attributes) already included, which are the numerical, standard details of the transaction. These are the same details or fields or attributes you can see when you open the transaction module.
In this example, we are using the quote transaction. You will see quote number or quote date as well as bill to and ship to for each individual quote. The transaction features will auto-populate according to the individual transaction that you selected for the template.
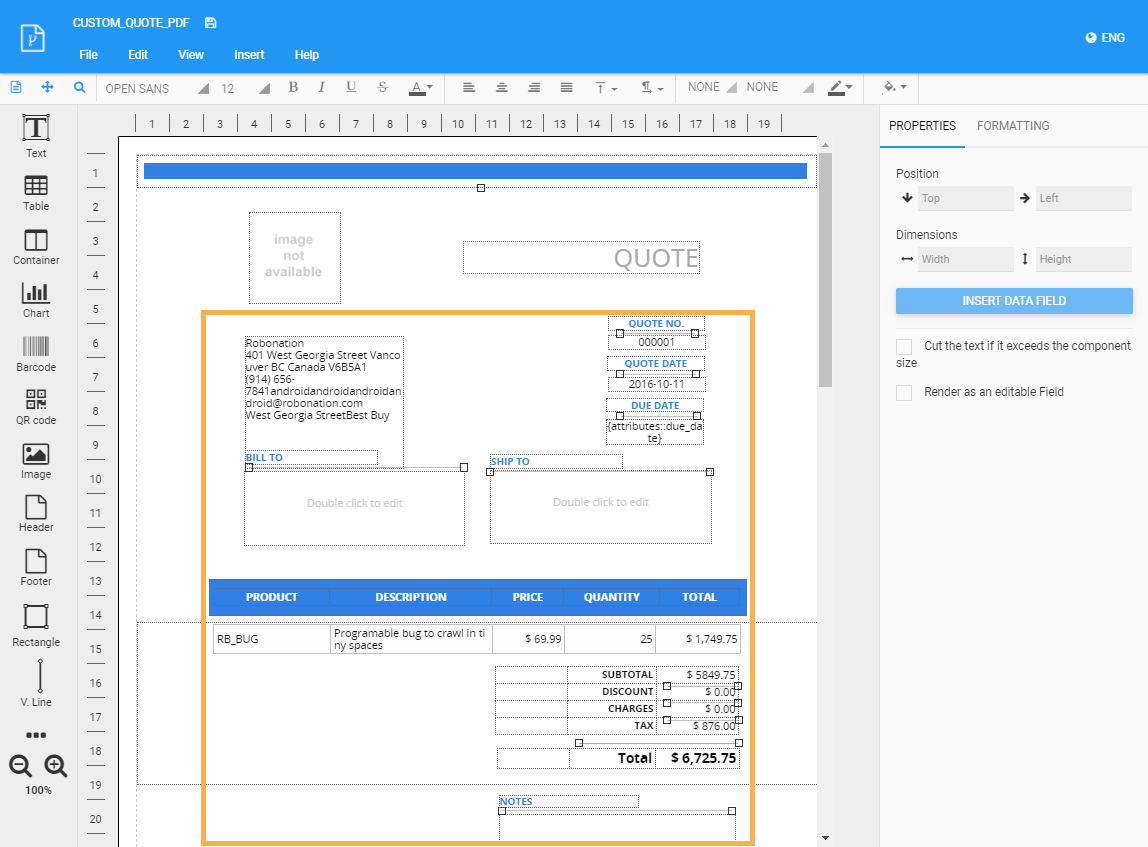
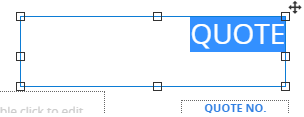
If you do not want the title of this PDF to be the module name itself (quote in this example), you can double click on the text box to edit it. Note that this will be the name for any individual quote you apply this template to.
Delete attributes
If you do not want to keep some attributes, for example, you do not want a due date on your template, you can click on the box and press backspace to remove it entirely.
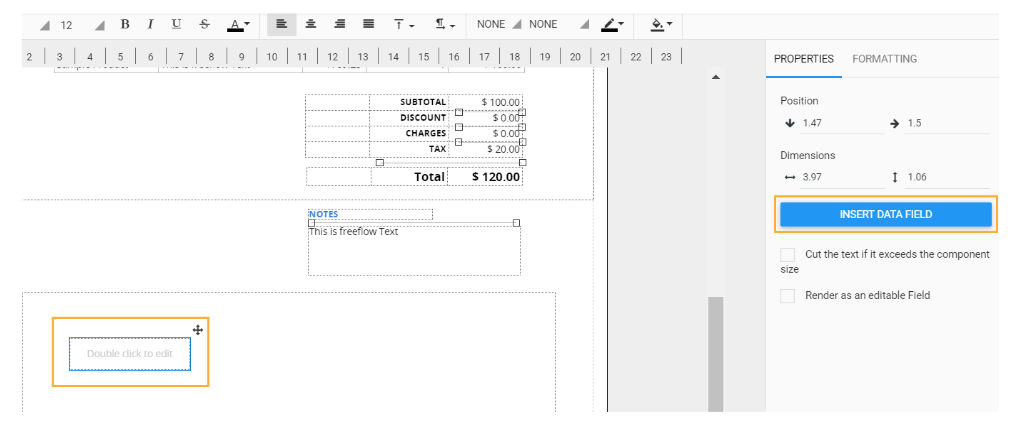
Add attributes
If you want to add an auto-populating field that you do not currently see on the default template, you can add it. You can select the prop or the type of figure you'd like from the left-hand sidebar.

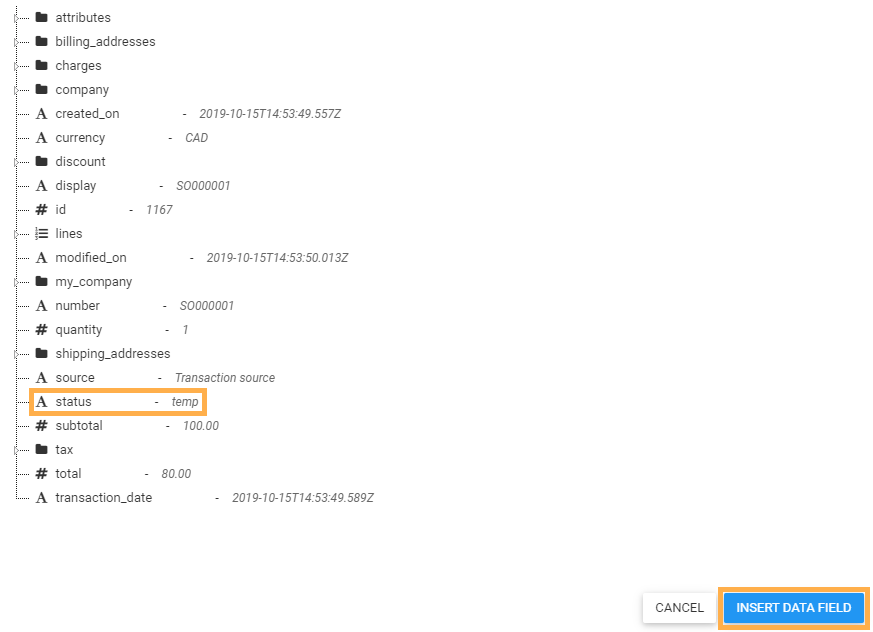
From here, you can populate your figure or text box. Click on the text box or the given cells. You can manually type anything you want to have as a permanent addition to the template. Otherwise, you can click on the text box or the cell where you would like an auto-populating input and click on insert data field to navigate to the detail you would like to obtain information from. Through this, you can link an attribute to this cell so that the value of that attribute from that specific transaction will automatically populate.

The image below is of the pop-up modal you will get when you click insert data field. From here, you can choose the attribute you want to fill your figure with. Here, as an example, we have highlighted status. The temp next to it is dummy text, just as an example of a status. All the fields next to the attributes are dummy texts used to identify what the attributes are, just in case the attribute isn't clear (CAD, CAD being an example of a currency)
Adding date attributes
Enter YYYY-MM-DD\THH:mm:ss.SSSSZ in the input format box under formatting on the right-hand side:
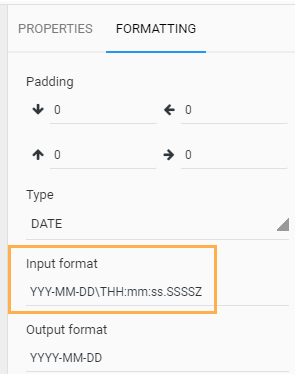
Other acceptable date formats include: MM/DD/YYYY, YYYY/MM/DD, MMM-DD-YYYY, and DD/MMM/YYYY
Please note that if the format is not added, the date attribute will not be printed.
Adding line discount attributes
Right-click on a cell inside a line to insert a new column:
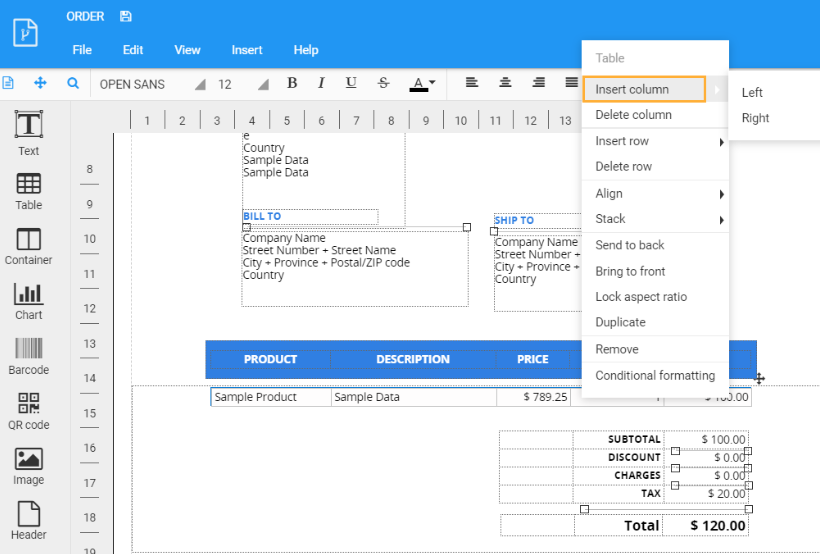
Here we have added a column for discounts:
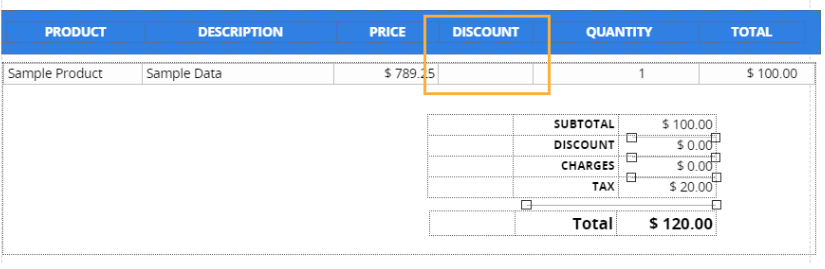
- Double click to edit the new cell to display the value of the discount attribute
- Click insert data field on the left panel
- Scroll down to Discount/List
- Select the discount attribute you want to display and click insert data field

#amount displays the value of the discount attribute:

code displays the name of the discount attribute:

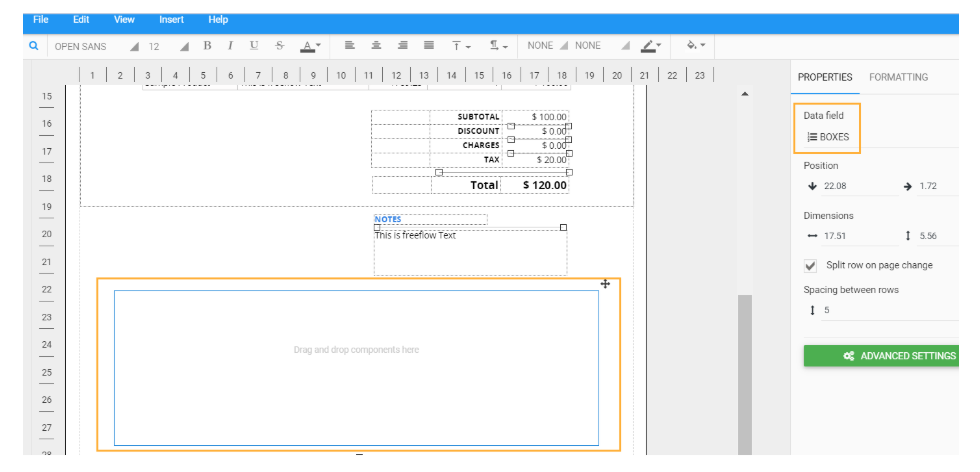
Adding box templates attributes
In this example, we are using the packing list. Open a packing list template
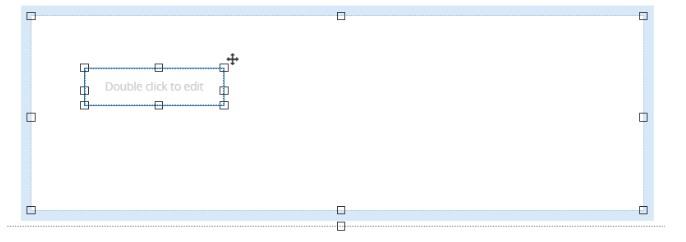
- Add a container to the template.
- Select the container (it must be highlighted in blue) and select boxes as the data field in the panel on the right.
6. Select the box attribute you want to display and click insert data field to save your changes.
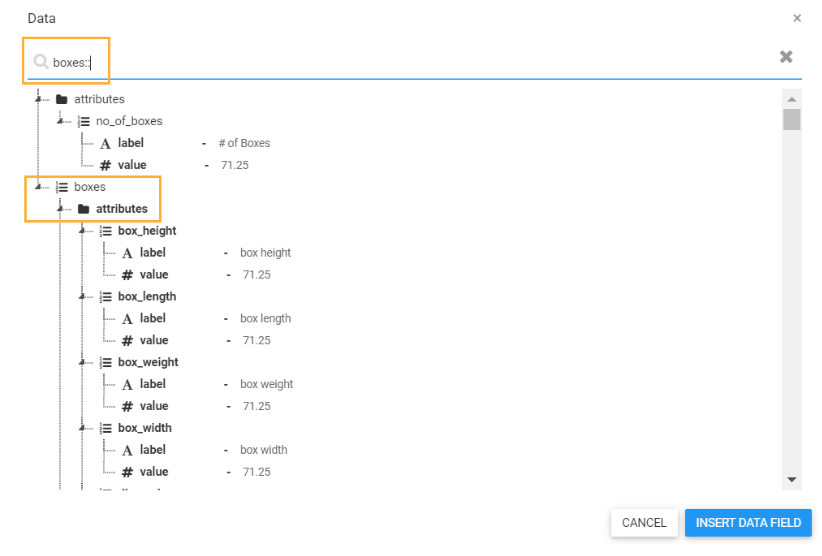
You can add several attributes (one at a time) inside the same sample text element. Repeat the above steps to do that.

If you have added a table instead of a sample text box, when you double click inside a cell and click insert data field, make sure the search field is already filled with boxes::lines::

Print pictures
- Add the image component to the template

- Make sure the component is highlighted in blue or select it to highlight it

- Click insert data field on the left panel
- Enter picture in the search field

- Select the appropriate value:
To print the picture of my company, select the data: my_company > attributes > picture > value
To print the picture of a customer or a vendor, select the data: company > attributes > picture > value
To print the picture of an item, select the data: lines > item > attributes > picture > value
6. Click insert data field
You can see that the picture of my company from settings is displayed automatically to the default transaction templates.
Print items by line
- Open a transaction template
- Move the subtotal, discount, charges, tax and total table outside the lines container

- Move the image component inside the lines container

- Make sure they are highlighted in blue

- Select the image component
- Copy and paste the following text in the value field: {item::attributes::picture::value}

- Save the template
Formatting your custom PDF
There are more auxiliary features that can be added, as can be seen on the left-hand side. You can also format the template by using the bar on the top.![]()

Print barcodes
- Open the product template (for example)
- Add the barcode component to the template

- Select the barcode and click insert data field
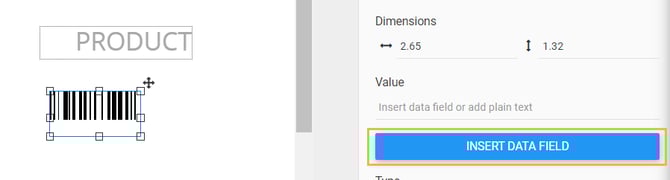
- Select the relevant data for your item (ie SKU, UPC...) and click insert data field.


- Save the template
Print the source of each transaction line
To print the source of each transaction line, simply insert the field lines::source field in the template.
Navigating the menu bar on the PDF template
You can take various actions related to your template using the menu bar at the top of the template.![]()
 Import and export
Click on file. This will give you the option to import and export. (This article explains how to import custom pdf templates.)
If you would like to download it in a certain format, there is the option to do so once you click on download as.
Preview and edit modes
You have the flexibility of flipping back and forth between preview and edit to check out how it looks as you're making modifications. Click on view and you will be able to do this.
Rename or Delete your templates
Once a template has been created, you can change the name of the template at any time with the rename/delete option at the top right corner of the PDF template screen.

Rename your template
Clicking the rename option will open a modal allowing you to enter a new name for your template.

You will see a notification asking you to restart Paragon:

Delete a template
If a PDF template becomes obsolete or has been replaced, you can remove the unwanted template from the list by clicking the delete option.
You will be shown a modal where you must confirm the deletion.

If you confirm, you will see a notification asking you to restart Paragon.

What's next?
Now that you've created your custom PDF output templates, you can configure where and when each template should be used in printing and/or emailing through the print and/or email action button.
How to configure conditional custom PDF printing and emailing