![paragon logo-1.png]](https://support.paragon-erp.com/hs-fs/hubfs/paragon%20logo-1.png?height=50&name=paragon%20logo-1.png)
Introduction
You've probably just connected Paragon to your Shop. Your QuickBooks Add-On is now set to active status. If this is the first add-on you're activating, the setup modal shown below will appear. It allows you to select and apply the settings you want when managing your integration. For a full walkthrough connecting QuickBooks to Paragon, read our article on connecting and disconnecting Paragon from QuickBooks Online.
Automatic import and export
The first step in the modal asks you which references and transactions you want to have automatically imported and exported to and from QuickBooks.
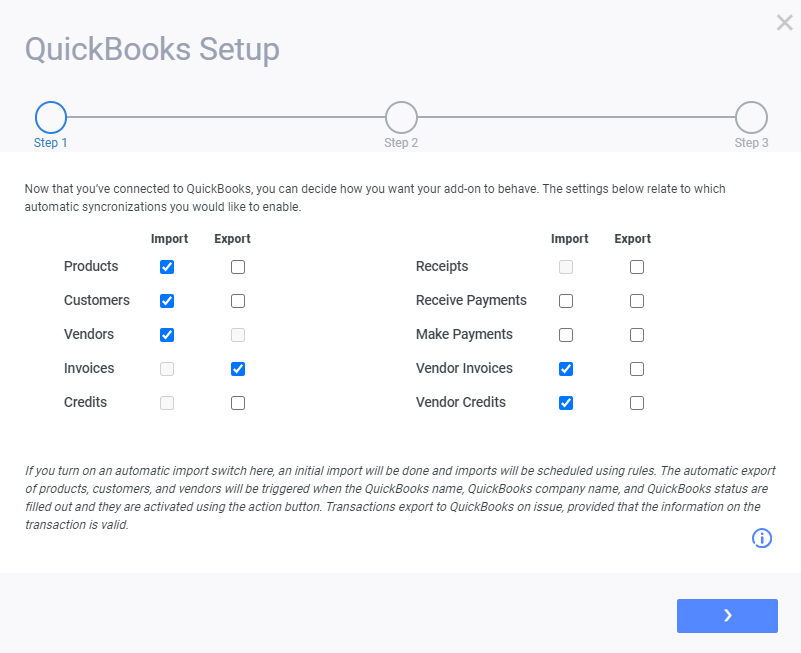
Although these settings are fully configurable, to get the most out of your add-on, we recommend that you at least turn on automatic import and export of your products, vendors, and customers. Any functionality that we don't currently support has been greyed out and cannot be selected. As a note, customers and vendors are imported together, so if you turn on automatic imports for one of them, the other will be turned on for you. The same is true for vendor invoices and vendor credits.


Note that these switches specifically relate to automatic imports that will be done through scheduled rules. You can later import your QuickBooks references or transactions manually through the various action buttons on the QuickBooks add-on screen as well as within each transaction screen.
If you have also connected to another add-on, there are a few recommendations for how to configure your settings for optimal results:
- If you have connected to Shopify, or if you plan to later, we recommend that you turn on product, customer, invoice, and receive payment export. This will allow you to manage the bookkeeping side of your Shopify sales easily since any Shopify orders or related transactions will be automatically sent to QuickBooks.
Inventory management in Paragon
The last step to configuring your QuickBooks add-on is deciding whether or not you want to use Paragon to manage your inventory.
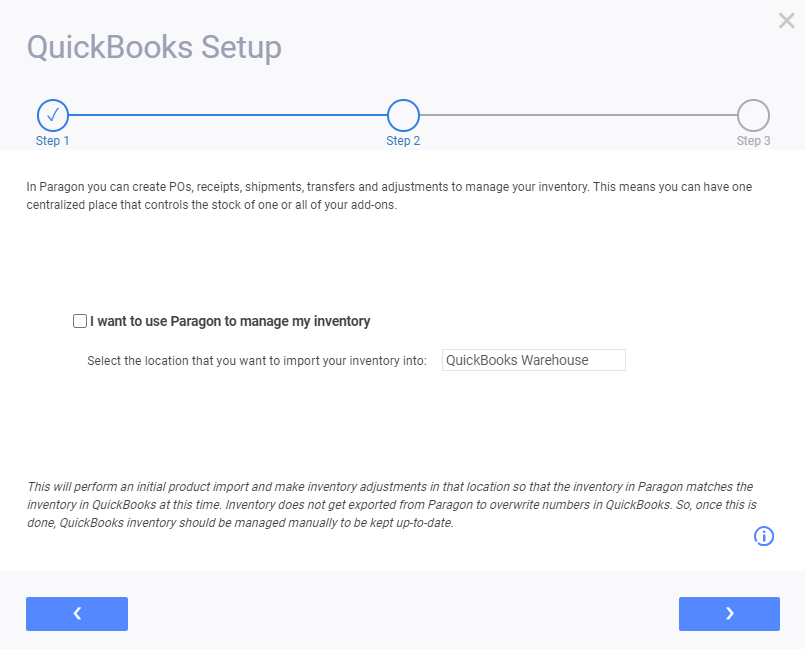
If you didn't turn on product import in the last step, the options on this step will be greyed out. If you would like to manage your QuickBooks inventory in Paragon, go back to the last step and turn on product import.
Once you are happy with your settings, click accept. You will see your chosen settings have been applied in the QuickBooks attribute panel.

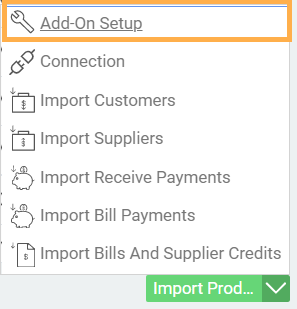
Returning to the add-on setup modal
If you want to change your QuickBooks settings later, you can bring up the setup modal again by clicking the action button and then the add-on setup action button.
What's Next?
Now that you've connected Paragon to QuickBooks and you've set all of your automation configurations, maybe these other QuickBooks articles will be your next stop:
Exporting purchase orders from Paragon to QuickBooks Online
Exporting invoices and credits from Paragon to QuickBooks Online
Exporting purchase orders from Paragon to QuickBooks Online
Exporting invoices and credits from Paragon to QuickBooks Online