Using the Bulk Pick by Receipt Function

Using the Bulk Pick by Receipt Function

Introduction

With certain business models (like a make to order or seasonal make to stock businesses), it can be very advantageous to have the ability to pick, pack, and ship goods out as soon as they are received into your warehouse. The less time the goods stay on the shelves, the better the cash flow can be. The bulk pick by receipt feature will help you pick goods based on the receipts that have already been made. You can create pick tickets for receipts that represent multiple sales orders for your clients, allowing you to efficiently move inventory off the shelves.

Setup

Note that this function only works if pivot view is configured

For the bulk pick by receipt function to work, you will need to make sure certain things are configured correctly.
Firstly, you will need to make sure you have a default receiving location set up for each warehouse you receive to.


The pick module needs to have the attribute receipts list configured through screen setup. This allows Paragon to determine which receipts can be selected when creating your picks.


If you need any help configuring it, please reach out to us at support@paragon-erp.com.

Workflow

Once you have configured your locations and the pick screen, you are ready to begin the process of picking by receipt. You will need to have a receipt in completed status 
to begin using the function.
To access the bulk pick by receipt feature, navigate to the functions module. Click on the more button in the bottom left corner of any screen in Paragon and click on the functions button.


From the column on the left, click on the bulk pick by receipt tab.


The bulk pick by receipt screen is split into 3 main sections.


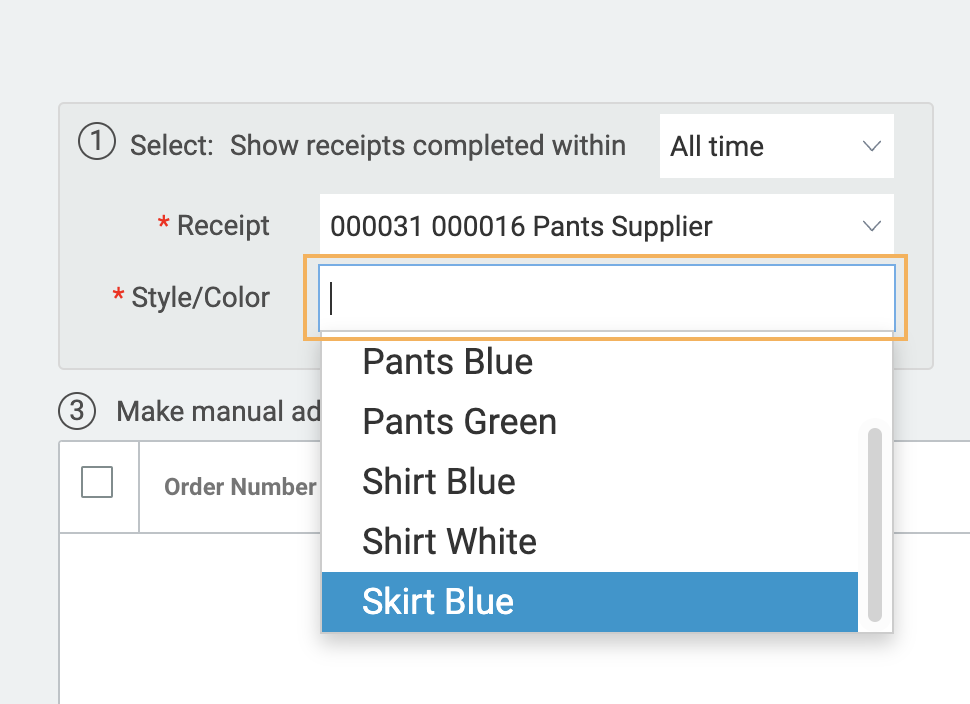
Section 1 - Fill in the required information

The first field is a drop-down list that allows you to select a timeframe of sales orders to show, based on when the receipt was received. The option you select will be saved for the next time you use the feature. This is saved by user profile so anyone using the feature will see their preferred selections each time.


Click on the receipt field to see a dropdown list of all receipts that are in complete status and that fall within the timeframe you selected in the first field. Select one.


The first style / color on that receipt will automatically be selected in the second drop down, but you can select a different one from the drop down if needed.


Section 2 - Select an automatic reservation option

This section allows you to fill the sales order grid automatically based on certain criteria rather than manually filling one cell at a time. There are three options for this automation: 

- Fully pick - Selecting this will fill all of the pick columns with the full outstanding quantity if there is enough quantity in the receiving location for that entire order line. Use this option when you want to pick all units for the selected orders.

- Partially pick by % - This option will allow you to enter a percentage to apply to all pick columns for the selected orders. To enable this button, enter a percentage in the adjacent field. (You can also decide to have the units round up or down if the percentage calculation does not come out to a whole number.)

- Reserve by rule - This option will allow you to select any predetermined rules that you may have to calculate the number of units to be picked for the selected orders. For more information about rules, please contact us at support@paragon-erp.com.


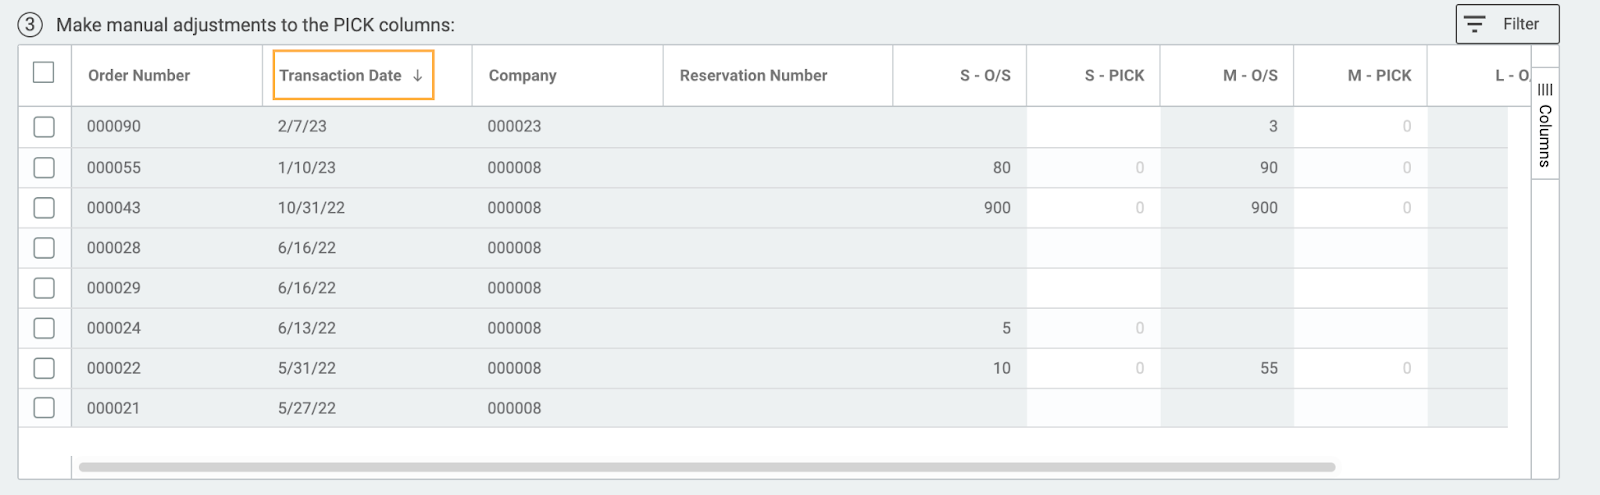
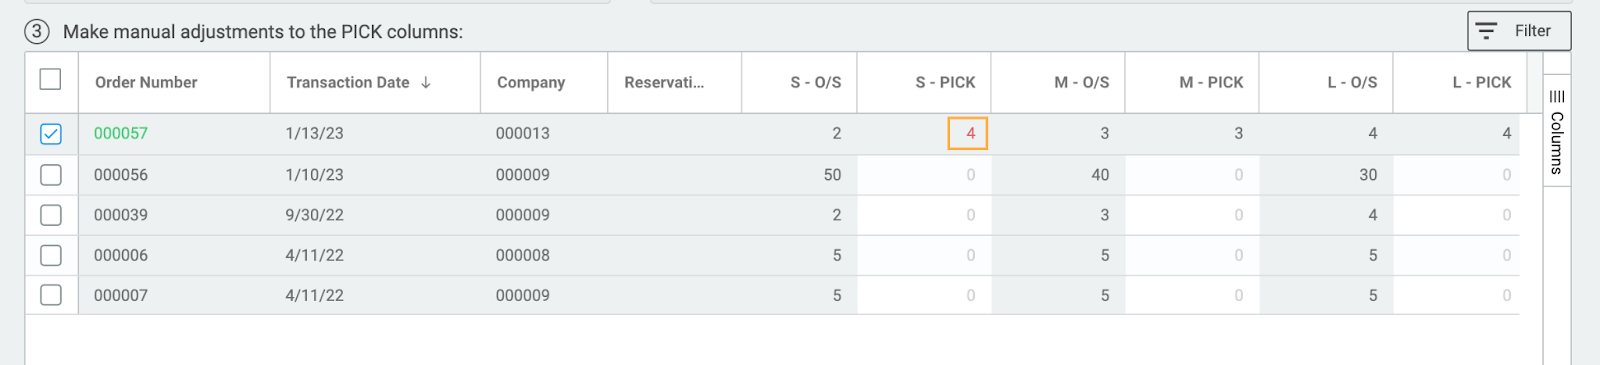
Section 3 - Make manual adjustments to the PICK columns

The grid in section 3 will list sales orders with outstanding quantities to be picked that match your section 1 selections.


As you edit or fill the units to be picked for each order, the grid at the bottom of the screen shows the following information for the selected style/color (by size):

- Quantity in receiving - units of the selected style/color available in that receiving location

- To be picked - outstanding units to be picked from the order

- Remaining - any units still remaining (not yet picked)


As you fill in the pick columns in the top grid, the quantities in the bottom grid will be adjusted automatically. The grid will show the stock for that style/color per size in the default receiving location of the warehouse that the receipt was received into (the ship to on the receipt).


Filtering your orders

If needed, you can filter the orders in the list by any attribute that has been configured on the order module list view. For example, this can be used to pick items for your highest priority orders and most loyal customers first.


To use this feature, click the filter button at the top-right of the order grid. You will see a list of possible filtering attributes that you can use.


The list of sales orders can also be sorted by attribute by clicking on the attribute names that appear on the top row in. For example, this is useful for sorting by transaction date so that older orders are shown at the  top of the list.


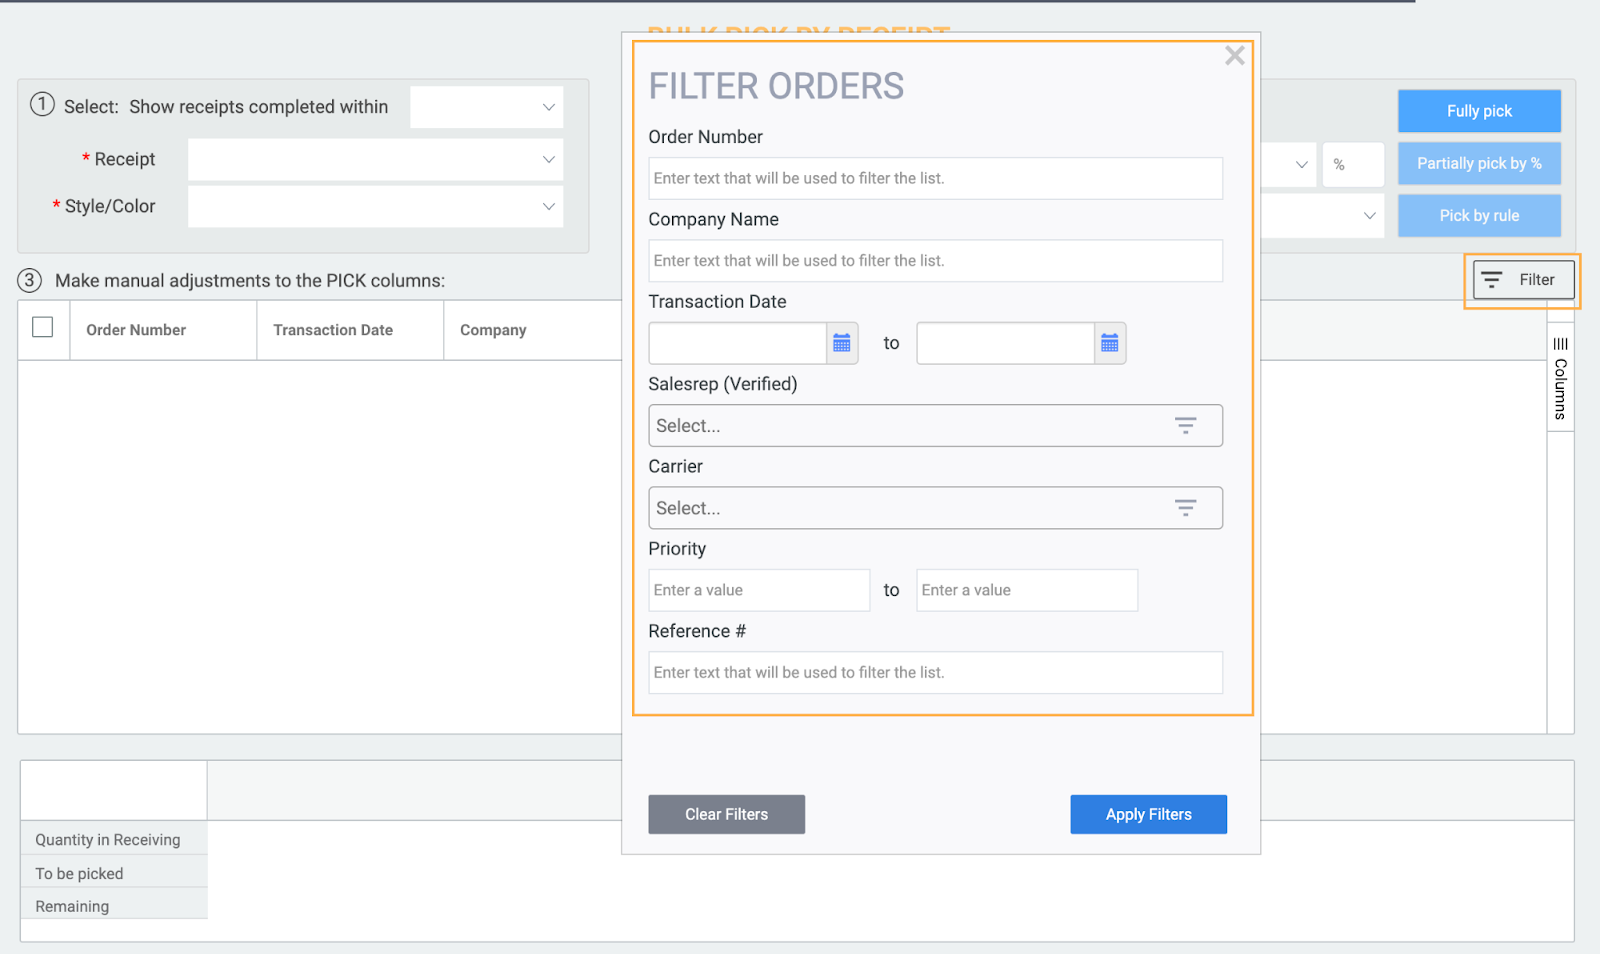
You can also easily customize the grid to your liking by adding or removing attributes without navigating to another page.

Creating a bulk pick

If you would like to use one of the automatic pick options in section 2, select the corresponding checkbox next to an order number.You can also begin by manually entering the number of items to pick by filling in the pick fields for each size.


If you have entered an amount to pick that is greater than the amount on the order, the number will appear in red.


If you have picked quantities that are lower than the total outstanding quantity in the order, the order number will appear in yellow.


When you are done with the style/color selected but wish to continue this bulk picking process for the selected receipt, you can click on the accept and continue button in the bottom right to move onto the next style/color that is on the same receipt.


Notifications will appear letting you know that your progress will be saved and that a temp pick has been created. The quantities entered for that style/color will be added to that pick. When more style/colors are entered, they will be progressively added to this same bulk pick. This allows you to start creating a bulk pick and return to it later if needed.


You will also be able to see the Pick number that you are working on in the bottom of the screen, beneath the ATS grid. Once you have processed and entered quantities for all the items that will be picked, you can click on the final accept button in the bottom right.


A modal will appear asking you to enter the date for the pick. You can click on the cancel button if you want to go back to change anything. If you are ready to create the pick, select a date from the date picker and click on the accept button.


A notification will appear confirming that the pick was created and now issued.


What’s next?

After your picks have been created and issued, you can continue your shipping process as usual. You might also want to make use of other relevant Paragon features. You can read more about them in the following articles:


    • Related Articles

    • Bulk Inventory Movement

      Introduction Bulk inventory movement allows you to select multiple items in large quantities and move them to the same or different locations simultaneously. Using this function allows you to filter through your inventory available in every location ...
    • Using the Bulk Reservation Function

      Introduction The Bulk Reservation function allows you to reserve inventory in bulk by allowing you to select multiple orders that you want to create reservations for. In this function, you can filter through your issued orders by an item’s ...
    • Fix pivot view using the rebuild function

      Sometimes it happens that your items do not pivot horizontally in transaction screens even if pivoting had previously been enabled.  In these circumstances you see all items (SKU's) vertically aligned one under the other, like the below image. This ...
    • Creating a receipt

      Introduction The Paragon receipt module can be used to receive finished goods or raw materials from your vendors, or it can be used to receive returned goods from your customers. Paragon makes this process easy and efficient by offering you multiple ...
    • Using the pick ticket details screen

      Using the pick ticket details screen The pick ticket details screen is where the pick is recorded. You will have arrived here after having selected a product in the pick ticket summary screen. The controls located at the bottom of the screen allow ...