Using the 2Ship integration
Introduction
No matter what your business shipment workflow is, the volume of products you ship, or where you ship to and from, 2Ship can be used by everyone. It allows you to make decisions on cost versus efficient shipping, such as which carrier is fastest, or least expensive. Paragon sends your shipment details to 2Ship and pulls data to display in Paragon, so data entry is minimal - it does all the hard work for you!

The 2Ship integration is currently only available by request. Contact support@paragon-erp.com for more info!
Setting up the default 2Ship key
First, navigate to the settings page and click on my company.
Click on the edit button
Then, click on the add an attribute button.
Select 2Ship key from the dropdown menu.
Enter the 2Ship key provided by 2ship and click save.
If this is your only 2Ship key, you can skip the individual user accounts section.
Shipping with 2Ship under individual user accounts
With multiple users on Paragon, you may want to have different 2Ship keys assigned to different users. You can be logged into your specific 2Ship account when sending a shipment from Paragon. Each user can have their own unique 2Ship key associated to them, otherwise the default 2Ship key (stored in My Company settings) will be used.
Setting up 2ship keys per user
Creating a person
To navigate to the person module, click on the more button from anywhere in Paragon, and select person.
Double-click the person you would like to view in detail view, or create a new person.
Click on the edit button.
Click on the add an attribute button.
Select 2Ship key from the dropdown menu.
Enter the 2Ship key provided by 2ship then click save.
Assign the person to a user profile
Navigate to the settings page and click on user management.
From there, you can edit specific user settings by clicking on the edit button next to their name and info.
Select the person you just assigned the 2Ship key to from the drop-down arrow and click accept.
Configure the integration
Set up box attributes in screen setup
In order to integrate Paragon with 2Ship, we need to make sure that measurements for parcels and boxes will match up in 2Ship itself. For this, we need to add a few attributes to our screen setup.
First, navigate to the settings page and click screen setup.
Click pack from the list of modules on the left and you will see an option to edit box attributes. Click this to add any missing attributes we may need for the rest of the process.
In this attribute modal, we will need to add weight uom and box weight if they are not already listed.
Remember to check the disallow multiple and always show options.
Click the accept button and remember to save before proceeding. After you save you will need to log out and back into Paragon to see any changes you've made.
Create a packing list with boxes
The next step is to create a packing list that you will use for the shipment. To navigate to the pack module, click the more button from anywhere in Paragon, and select pack.
You have the option to create a packing list from an existing pick or order, or you can make one from scratch manually. In either case, make sure your customer details and addresses are all in order as well as the items. Once you are happy with your packing list, issue your pack.
After your pack has been issued, you can click the action button arrow and you will be given the option to box your packing list.
Now you can start assigning items and measurements to your boxes. Simply select the option for new box and select the standard box from the template dropdown. You will notice that some attributes may be missing from the template. Simply click edit and add the weight uom and box weight attributes.

If you added the box weight and weight UOM they will appear in 2Ship. If you didn't add them you can still add them manually.
When you're happy with your packed boxes, click review and then accept and you're ready to head over to the shipment process!
Create a shipment from the packing list
Once your boxes are complete, you are ready to create a shipment. Navigate to the ship module from anywhere in Paragon by clicking the ship icon. From here you can create a shipment from any issued packing list.
From the action button, issue the shipment and you will receive a success toaster on completion.
Use 2ship
After issuing the shipment, you will see a 2ship button in the action button:
Click the 2ship button and the 2ship website will be opened in a new tab. You can see your box measurements and other shipment details from the packing list setup.
To finalize your shipment, simply choose a carrier and click ship.
2Ship attributes in the More tab
After clicking ship in 2Ship, the attributes will now be available in the more tab of your shipment in Paragon. Click the more tab to view:
Tracking Number URL
Carrier Service Level
Shipment Tracking No.
Label URL
Total Shipment Weight
Weight UOM
Total Billable Weight (this corresponds to the Billed Weight which you can see when hitting on the $ button with the carriers)
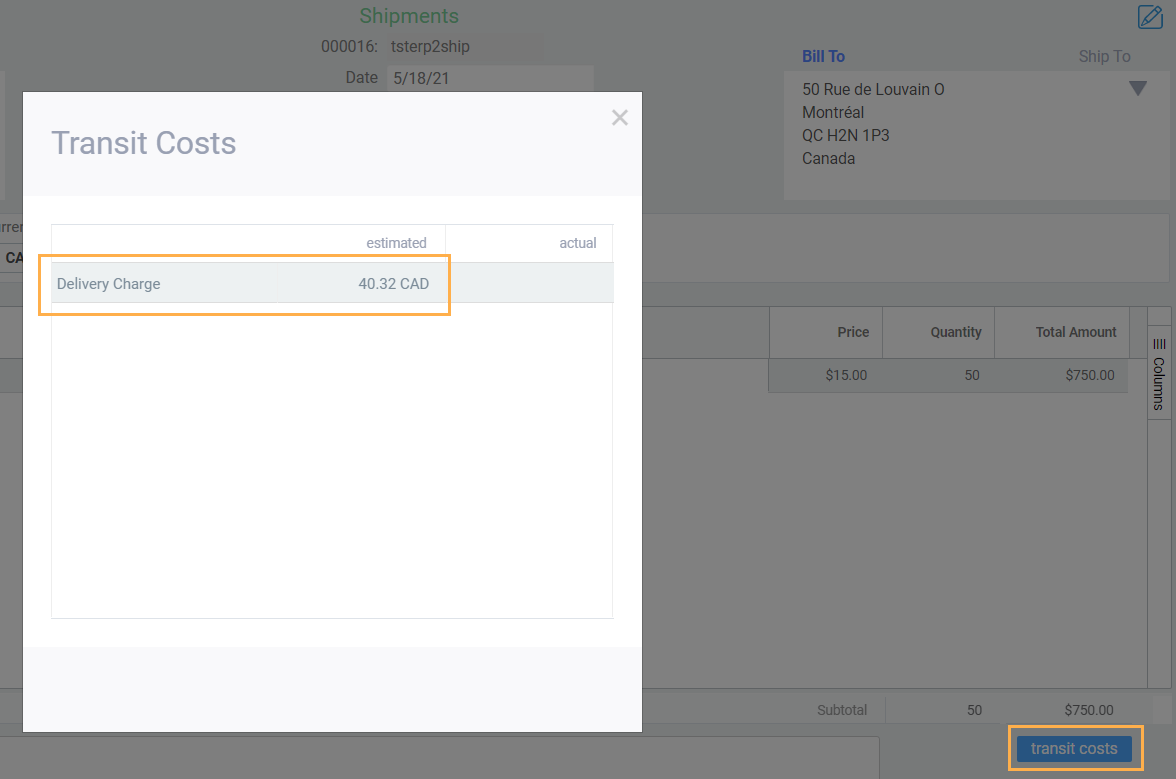
From the summary tab, click transit costs to see the estimated delivery charge of your shipment:
International Shipping
When you create a shipment that will cross the border and use the 2Ship action button, any information you enter in the customs section will be added to the more tab of the Paragon shipment. Meaning that any documents generated for this shipment will contain this crucial information. You will first need to make sure your customers and vendors have international addresses attached in the ship from and ship to sections in Paragon. If you need a recap on setting up addresses, check out our article on How to create a new address.
There are a number of attributes in Paragon that relate to specific sections of 2Ship, for both the ship module and the product itself. The attributes and their 2Ship counterparts are listed in the tables below.
Shipment Attributes
Shipment attributes cover the general details of the shipment itself and can be found on the first tab after clicking the 2Ship action button.
Paragon Attributes | 2Ship Attributes |
International Invoice Purpose | Purpose |
International Invoice Amount | Insurance Amount |
International Invoice Terms of Sale | Terms of Sale |
Importer | Importer |
Pickup Date | Ship Date |
Product Attributes
Product attributes are added directly to the product itself in Paragon and can be found in the contents section of the 2Ship screen. You will need to make sure you are viewing commodities and then click the blue edit button to view the information attached to your product.
Paragon Attributes | 2Ship Attributes |
Vendor List | Manufacturer |
Country of Origin | Country of Manufacture |
Item Weight | Item Weight |
NAFTA | NAFTA (Toggle) |
HS Number | General HS Code |
Textile | Textile (Toggle) |
Textile Information | Textile Information (appears if Textile is toggled 'on') |
Quantity Unit of Measure | Unit of Measure |
Yarn/ Fabric/ Fiber | Description |
Generate shipping documents and manifests in 2Ship
Documentation is a key component to successful fulfillment so that both your carrier and receiver know what goods are packed in each box and where they need to be sent. Making sure that you’ve included all the required documents with each shipment is no easy task. Luckily, our 2Ship integration handles all of that paperwork for you.
After you create a shipment using the 2Ship action button, there is a close shipments action. Click this and the 2Ship website will be opened in a new tab.
From here, you can view the list of your current open shipments for the day so that you can close them by carrier and download any of the necessary paperwork required for successful fulfillment. It’s as easy as that!

What's next?
Related Articles
Calculate Actual Costs
Introduction Actual costs refer to an updated item value that includes any additional fees or charges incurred after shipping or receiving goods. These fees are usually not known at the time of the shipments or receipts. The invoices for these fees ...AGLV - Using List View
Introduction Navigating to most modules in Paragon will bring you to the list view page. The list view neatly arranges your records in a vertical list. Its purpose is to help you easily analyze information by grouping and/or filtering your data based ...Using the boxing function
Introduction When it comes to packing and shipping your products, Paragon helps to streamline your process by allowing you to box your items from any transaction in the order to cash process: order, invoice, pick, pack and shipment. Access the ...Using the Bulk Reservation Function
Introduction The Bulk Reservation function allows you to reserve inventory in bulk by allowing you to select multiple orders that you want to create reservations for. In this function, you can filter through your issued orders by an item’s ...Using the Bulk Pick by Receipt Function
Introduction With certain business models (like a make to order or seasonal make to stock businesses), it can be very advantageous to have the ability to pick, pack, and ship goods out as soon as they are received into your warehouse. The less time ...