Setting up transaction screens

Introduction

Paragon allows you to decide on a module by module basis how all your screens are configured. For example, information that may be important to see on an invoice may not be relevant on a shipment.
This article will explain how to set up all your transaction modules to get you started. You can also learn about attributes and how to setup your reference screens.
 

Note that attributes must be setup before your transactions/reference screens.

Navigate to the screen setup

From any screen in Paragon, click on the settings button.
 
Then, select screen setup under the system card.
 

Select the module you'd like to set up
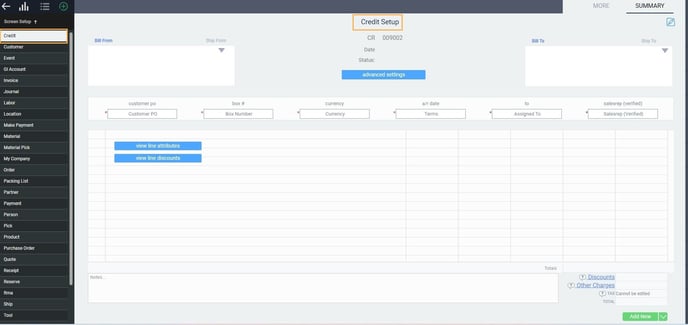
This is a list of all the modules in Paragon whose screens can be configured. Choose the transaction module you'd like to set up from the list on the left hand side. All transaction screens have a consistent layout, which means that once you're familiar with one, you can do them all!
As an example, credit was selected. It looks very similar to the actual credit transaction screen.
To begin making changes, click the edit button. The next few sections will explain how the different parts of the setup can be configured.
 

Edit the transaction ID

Transaction IDs are composed of a prefix (1) and a number (2).
 
  1. The prefix can be an alphanumeric value that will appear at the beginning of every transaction. The default prefix for credit is CR.
  2. The second part of the transaction ID is a number. This number increments by 1 for every transaction of the same type that is created. On the screen setup you can decide the number at which the sequencing will begin. For example, credits can start at number 100000 (100001, 100002, 100003...), and invoices can start at number 300000 (300001, 300002, 300003...).
To change the prefix or starting number of a transaction type, change the values in the two fields above the date.
 

Only a 6 character number will be accepted in these forms. If the numeric value is not being accepted, the value will appear in red. To prevent this, make sure all numeric values are 6 characters long by manually entering 0's in front of the value. By example, 300 would become 000300.


You cannot enter in a lower number than what is already there (i.e. you cannot start your transaction numbering from 1 again after transactions have already been created)


Edit business terms

You can add up to six terms to this area, and arrange them in any order you like.
To change one of the business terms, click into the lower field. A drop-down list will appear. This list contains all the attributes that are currently set up. Select the term you'd like to have in this position on this transaction.
After you select a term from the list, the upper field name will change to display the default name of the term. This field is the term's label, and can be changed to say whatever you like.
For example, you can change box number to box #. To do so, click into the upper field and edit the text.
   

Make business terms mandatory, if applicable

Depending on the transaction, you may want to make certain terms mandatory. To do this, click the asterisk to the left of the business term.
  1. A red asterisk denotes that a field is mandatory, meaning that a transaction cannot be created without entering a value.
  2. A grey asterisk indicates that the field is not mandatory and the transaction can be created even if it is left blank.


Edit tax security

You may, or may not want to allow certain users to override/ edit taxes. To set the tax security in any of the transaction modules, select one of the three options from the drop down menu: can be edited, cannot be edited, or, don't show.


You may want to check with your accounting department before changing the tax setting to can be edited.


Edit line attribute

Click the edit line attribute button. 
A new modal will popup on screen.
If you wish to add attributes, click the add new button situated at the bottom left. This will add a new empty line. A drop-down list will appear when clicking the empty field. From that list you can select the attribute you'd like to add. 
 
Then, you can finish setting up the line attributes by following these steps:
  1. Assign the order of the attributes: This is done by assigning numbers, starting at 1, into the ordinal column.
  2. Make the attribute mandatory: If you check off this box, the attribute must be filled in before the reference/transaction is issued. 
  3. Allow the attribute to be added to the module more than once: This is useful for information like phone numbers and email addresses. 
  4. Make the attribute always show on the screen: When you are creating a new reference, you are given a list of default attributes to fill in based on the setup you're doing here. If you want an attribute to always be part of this default list, check off always show. If you do not check this off, the attribute will be found in the blue plus button of the reference screen
 
You may also remove any attribute by clicking the delete button on the left side of every line.

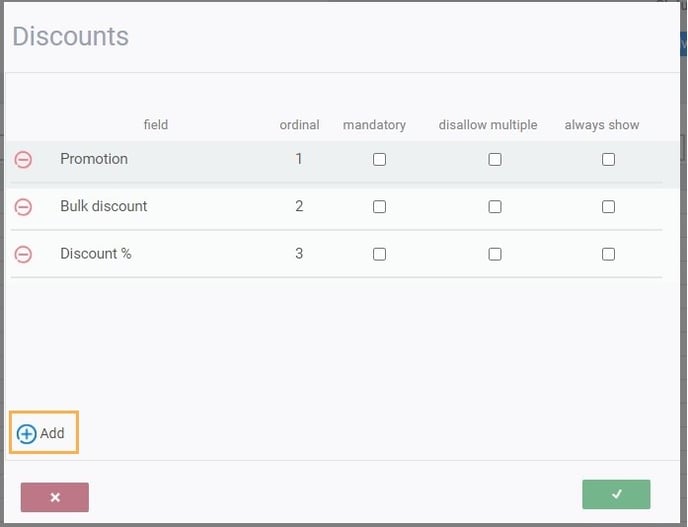
Edit line discount

The process is identical to the line attributes. First, click the edit line discounts button. 
A new modal will popup on screen.
If you wish to add attributes, click the add new button situated at the bottom left. This will add a new empty line. A drop-down list will appear when clicking the empty field. From that list you can select the discount attribute you'd like to add. 
 
Then, you can finish setting up the discount attributes by following these steps:
  1. Assign the order of the attributes: This is done by assigning numbers, starting at 1, into the ordinal column.
  2. Make the attribute mandatory: If you check off this box, the attribute must be filled in before the reference/transaction is issued. 
  3. Allow the attribute to be added to the module more than once: This is useful for information like phone numbers and email addresses. 
  4. Make the attribute always show on the screen: When you are creating a new reference, you are given a list of default attributes to fill in based on the setup you're doing here. If you want an attribute to always be part of this default list, check off always show. If you do not check this off, the attribute will be found in the blue plus button of the reference screen
You may also remove any attribute by clicking the delete button on the left side of every line.

Check out the more tab

The tab we were working on is called the summary tab. Now we will move to the more tab where you can setup more attributes related to the transaction itself.
 
Click the add attribute button if you'd like to add a descriptive attribute to associate to the credit module. It is situated at the bottom left of the screen.
 
An empty line will be added.
 
Choose an attribute from the list displayed: 
 
Then, you can set up the attributes by following these steps:
  1. Assign the order of the attributes: This is done by assigning numbers, starting at 1, into the ordinal column.
  2. Make the attribute mandatory: If you check off this box, the attribute must be filled in before the reference/transaction is issued. 
  3. Allow the attribute to be added to the module more than once: This is useful for information like phone numbers and email addresses. 
  4. Make the attribute always show on the screen: When you are creating a new reference, you are given a list of default attributes to fill in based on the setup you're doing here. If you want an attribute to always be part of this default list, check off always show. If you do not check this off, the attribute will be found in the blue plus button of the reference screen.
 
To remove any attribute from the attribute panel, click the delete button to the left of the reference.


Locking feature

Paragon allows you to lock your transaction on issue if setup to do so by selecting it on the toggle. By default, it will be set to Don't Lock and will appear grey.
If you wish to have your transaction locked once issued, you can put it on lock. The toggle will now be blue.

Save and logout

Once you have made the necessary changes within the setup click the save button. 
 
You will receive a notification prompting you to logout.
When you log back in, the changes you made to any modules will be applied in the system.
Note that you may cancel the changes at any point of the listed steps by clicking on the cancel button.


How to use the locking / unlocking feature 

If the screen setup is set to Lock, whenever a new transaction is issued a lock will appear on the right corner of the screen. 
User permissions for the locking feature are defaulted to view only. To have that changed please contact our Services team (support@paragon-erp.com) to unlock a locked Issued transaction. A user with high enough permissions would have to unlock it - giving you access to the edit button which will now look like this.
 

Note that permissions are set per module, and not Paragon as a whole. In the example below, we are showing the permissions for the credit module.

You can also choose to read more on user access and security profiles.
 
If the toggle is set to Don't Lock, the lock will not appear on the right hand side of the newly issued transaction. Only the edit button will be there. 
 

If your user access permission is set to Create for that module

If you have high enough permission set for that module, the locks will now appear to be blue and will be clickable. You click on it to lock or unlock it.
.
 

Bulk Lock / Unlock


The following bulk action feature can only be used if you have activated action button rules with the help of our support team.

If you've set the module to lock on issue, note that existing issued transactions won't be locked automatically. In order to do so, you can either do it as shown previously for individual transactions or use the bulk feature.
 
Start by clicking bulk edit from the list view.
Bulk edit will now become bulk action. Select the transaction you wish to lock / unlock and when you're ready, click on bulk actions.
You now have the option to bulk lock or unlock your transactions.
 

For now, there is no way to know which transaction is locked or unlocked from the list view. You would have to make note of that.

In this example we will select lock. On the modal, make sure to select manually selected before accepting.
Once the changes have been made, a summary log modal will appear confirming which transactions have been locked/unlocked successfully.
If your transaction was issued but unlocked, whether it had the unlocked button or not, the button will now appear.
To bulk lock your transactions, follow the same steps, but select unlock instead. The previously locked transactions will now be unlocked, and the button will look like this. The edit button will be visible as well.

Edit transaction creation workflow

You can create custom workflows by deciding which type of transaction each stage can be created from, reducing confusion and user error. Configuration can be done in the advanced settings area for each transaction type.
 
From anywhere in Paragon, click on settings.


Then click on screen setup.
 
 
From there, you will be able to select the module you would like to change the settings of by clicking on the module name in the left column. In this example, we will be editing Credit setup.
 
To start editing, click on the edit button on the top right corner.


Click on advanced settings and a modal will appear.


From that modal, you will be able to select or unselect checkboxes to allow the source transactions you want to be able to create a credit from. If you unselect all of the types of transactions, then you will only be able to create a new credit manually. Once you are done, click on the accept button and the modal will close.
 
Click on the save button in the bottom right corner.
 
 
A toaster will then appear letting you know that you need to log out and log back in to Paragon for your changes to take effect.
 
 
In this example, we allowed invoices to be the only source transaction in the credit module. Therefore when creating a new transaction in the credit module, the modal will have invoice and manual tabs only.


Enabling custom BoM

Paragon gives you the option to enable custom BoM per module, in each module's advanced settings.
 

What is a custom BoM?

For example, your product has a standard BoM which was created when you initially set up your product. Sometimes, a customer would like a specific modification on that product. So, Paragon allows you to customize that product's BoM on the transaction itself instead of changing the product's BoM. A product BoM is the breakdown of the various components that make up that product. This is usually used in manufacturing or assembly.

To enable this, click on setting from anywhere in Paragon.
 
 
Click on screen setup.
 
 
Now navigate to the module you want to enable custom BoM on. You can do so by clicking on the module name from the list on the left-hand side column. In this example, we will be using the Work Order module. To start editing, click on the edit button on the top right corner.
 
 
Then click on advanced settings.
 
 
A modal will appear. From there, you can enable or disable custom BoM for that module by clicking on the corresponding checkbox. Once done, click on the accept button.
 
 
Click on the save button on the bottom right corner to save all your changes to the module.
 
 
A toaster will then appear letting you know that you need to log out and log back in to Paragon for your changes to take effect.


Remove lines with 0 quantities on issue of transactions

You can have lines without quantities automatically removed when a transaction is issued. This is especially useful when processing back orders where only one item is left outstanding until it can be fulfilled. It can be configured granularly per module with these three options: always remove the lines, never remove them, or to be asked before doing so.
 
To configure the setting to your needs, first click on settings from anywhere in Paragon.
 
 
Then click on screen setup.
 
The following steps can be done on multiple transaction modules. In this example, we will be using the Order module.
 
Now navigate to the module you want to customize. You can do so by clicking on the module name from the list on the left-hand side column. In this example, we have selected the Order module. To start editing, click on the edit button on the top right corner.
 
 
Click on advanced settings to open a modal.
 
 
In the modal, you will see a drop-down list of options for removing zero quantities on issue. Select the option that you want this transaction module to follow. We will go through the differences between the options next.
 
Once done, click on the accept button.


By default, all modules are set to NEVER

If the module is set to Always

As soon as you issue a transaction, any product with a line quantity equal to zero will vanish. 
 

If the module is set to Ask

If you have products with a line quantity equal to zero, a popup will appear, asking if you want to remove those products when you attempt to issue the transaction.
 
If yes is clicked, those products will disappear. However, if no is clicked, the products will remain, and the status will change to issued. In this example, we will click yes.
 

If the module is set to Never

The items on a transaction with a quantity equal to zero will never disappear.


What's Next?

Now that you know how to setup your transactions, why not take a look at the following articles!