![paragon logo-1.png]](https://support.paragon-erp.com/hs-fs/hubfs/paragon%20logo-1.png?height=50&name=paragon%20logo-1.png)
Introduction
Sometimes, you may have invoices billed to different customers that are crossing borders in one shipment for customs purposes. Or, you may have invoices for different stores that are shipped together to a central location. This article explains how to create a single shipment from multiple transactions (and possibly for multiple clients).
Create a new shipment
Go to the ship module and click the add a shipment button.


Select the transactions
From any of the creation tabs (except for manual), multi-pick all the transactions you want to create your shipment from.
In this example, we will create one shipment from multiple packing lists. Notice that this selection modal is not filtered by customer once you select one transaction - this allows you to select many transactions - even across multiple customers.
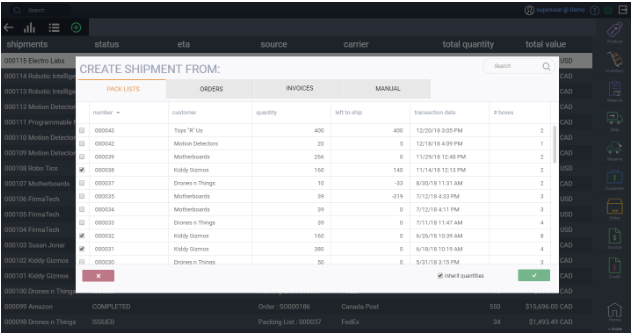
Once you are satisfied with the selections you have made, click the accept button at the bottom right of that modal to create the shipment.


The information in the shipment header will be filled based on the first transaction you chose. You can, of course, change this information once the shipment has been generated. This would require a manual modification to the shipment on your part by clicking on the edit button at the top right of the shipment detail view.

What's next?
As mentioned above, now that you have created your shipment, you can always edit it if any details need to be adjusted. You can also use any function in the action button such as issue the shipment, print it or email it. Learn more about creating shipments.