![paragon logo-1.png]](https://support.paragon-erp.com/hs-fs/hubfs/paragon%20logo-1.png?width=240&height=75&name=paragon%20logo-1.png)
Introduction
Process description:
My company settings is where you will store relevant information and default configurations related specifically to your company.
Instructions:
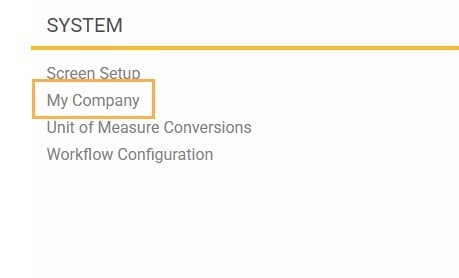
Navigate to My Company
Click the settings button at the top right hand side of the screen. This will bring you to the settings screen.


While in edit mode, any changes made to my company settings will require you to log out and back into ParagonERP in order for the changes to take place. If you click on the edit button, but decide not to make any changes, you can click on the cancel button. ![]()
The summary tab
Within the summary tab, there are multiple sections to fill out. The important ones are: business terms, module configuration and related warehouses.
Set up business terms
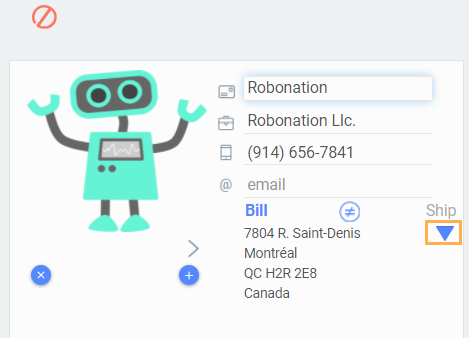
Your company's basic information is in the top left-hand section. We refer to this section as the business terms.

Here you can enter a phone number, email, insert a logo and add more addresses.
If your company has multiple shipping or billing locations, you can add additional addresses here in the my company section by clicking the blue arrow, and clicking new address. Once you do this, you will be able to choose the billing or shipping addresses for each transaction in ParagonERP.
This document will explain how to add additional addresses to selected modules.
Module configuration
On the right side of the summary tab in my company, you will see the section called module configuration. Let's look at a couple of the important options.

-
Pivot
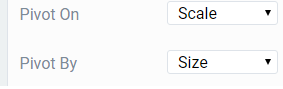
You can pivot your transaction grids based on two different attributes. The most commonly used attributes are scale and size. The term pivot is used to describe the way that the transaction lines are viewed or used. For example, if your products have individual records by size, you can choose if you want to view the line information by style or by style/size.
-
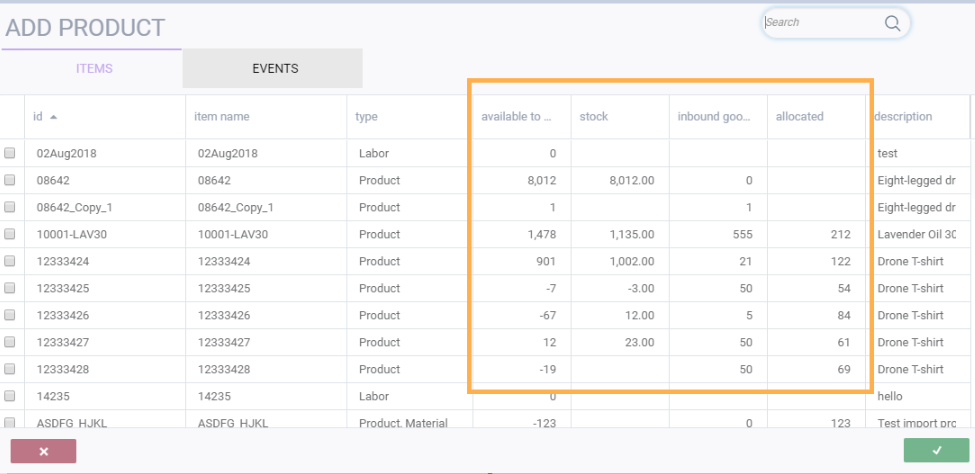
Available to sell (ATS) calculations
You will be able to select from one of three ATS options.

The options to calculate your ATS are as follows:
- ATS = Stock
- ATS = Stock + Inbound Goods - Allocated Goods
- ATS = Stock - Allocated Goods
Inbound Goods consist of the following:
- Open Purchase Orders
- Open Work Orders
Allocated Goods consist of the following:
- Reservation
- Pick
- Pack
- Open Shipments
You will be able to see the calculated ATS units on any product modal in ParagonERP:
-
Related warehouse locations

In some cases, a company will use a third party logistics warehouse (3PL) to store and ship its products. If you require this option, refer to this article, create related warehouses.
Identifier tab
Sometimes, identifying a product, customer or any other type of reference can be difficult, especially when you use codes or abbreviations. In ParagonERP, a record identifier helps you quickly identify a record within a module's list view.

Financials tab
First, open the financials tab and click the edit button.
Let's look at some important options available in this tab.
-
Bank accounts
In order to set up the bank account section in the financials tab, this link will walk you through the steps on how to create bank accounts and how to add them to the financial tab.

-
Default value for 0 stock
When your stock reaches 0 units, Paragon resets the inventory value to a default amount. We've added a setting to allow you to decide if that default value should be based on landed costs or initial purchase cost.

-
Automatic journal entries

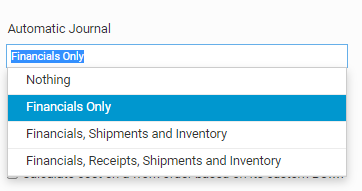
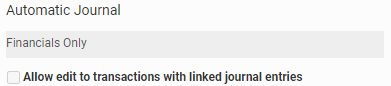

If the setting allow edit to transactions with linked journal entries is checked, you will be allowed to make changes that will affect the journal, but you will still receive a warning suggesting that you void the transaction.

-
Currencies
Next, you have the option to choose a default currency, as well as an accounting currency. This information was automatically filled in based on how you signed up for ParagonERP, however, it can be changed if you want.
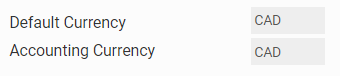
If you do decide to change your accounting currency and then click the save button, a warning modal will appear (shown below). If you click the cancel button, the screen will stay in edit mode. If you click the accept button, the accounting currency will be updated and you will be required to log out and back in to update your system.

Save your changes
Once you are done with your edits, click the save button located at the bottom right corner of the screen.

What's Next?
For more information on setups, take a look at these: